tensorflowのAPI、tf.one_hotについてメモします。
axisの使い方が少しややこしいので、簡単に整理しておきます。
tf.one_hotの概要
他の値(off_value)に対して、1つの値(on_value)を示します。
つまり、off_value=0.0で、on_value=1.0とすると、下のような行列が得られます。
incides=1(depth=10):
[0.0, 1.0, 0.0, 0.0, 0.0, 0.0, 0.0, 0.0, 0.0, 0.0]
incides=2(depth=10):
[0.0, 0.0, 1.0, 0.0, 0.0, 0.0, 0.0, 0.0, 0.0, 0.0]
下図のように、0-9をdepth=10に割り当てると、1のところに1.0をone_hotしています。
イメージ的には以下の感じです。
|
1 2 3 |
incides=1(depth=10): 0 1 2 3 4 5 6 7 8 9 #depth=10 [0.0, 1.0, 0.0, 0.0, 0.0, 0.0, 0.0, 0.0, 0.0, 0.0] #incides=[1] |
スポンサーリンク
tf.onehotの仕様
仕様は以下です。上で説明した、indicesとdepthが基本です。
|
1 2 3 4 5 6 7 8 9 |
tf.one_hot( indices, depth, on_value=None, #default = 1.0 off_value=None, #default = 1.0 axis=None, #default = -1 dtype=None, #default = tf.float32 name=None ) |
TensorFlow | TensorFlow
tf.one_hotの使い方
では、実際のコードを書いてみましょう。3つの例を書いてみます。
例1:一次元の結果(indicesが1つ)
|
1 2 3 4 5 6 7 8 9 10 11 12 13 14 |
#!/usr/bin/env python import tensorflow as tf out = tf.one_hot(indices = [1], depth = 10, on_value = 5.0, off_value = 0.0, axis = -1, dtype = tf.float32 ) a = tf.Session().run(out) print (a) |
例1の結果
|
1 |
[[0. 5. 0. 0. 0. 0. 0. 0. 0. 0.]] |
例2:二次元の結果(indicesが2つ)
indicesを2つ指定すると、10x2の行列で答えが返されます。10はdepthです。10の分類で、2つの結果が返されているイメージです。
|
1 2 3 4 5 6 7 8 9 10 11 12 13 14 |
#!/usr/bin/env python import tensorflow as tf out = tf.one_hot(indices = [1, 2], depth = 10, on_value = 5.0, off_value = 0.0, axis = -1, dtype = tf.float32 ) a = tf.Session().run(out) print (a) |
例2の結果
|
1 2 |
[[0. 5. 0. 0. 0. 0. 0. 0. 0. 0.] [0. 0. 5. 0. 0. 0. 0. 0. 0. 0.]] |
例3:五次元の結果(indicesが5つ)
indicesは、幾つでも増やせます。今回は、indicesとdepthだけ与えて出力させてみます。indiceで−1を指定するとどこも選ばれません。つまり、すべてoff_value(=0.0)です。
|
1 2 3 4 5 6 7 8 9 10 |
import tensorflow as tf indices = [1,2,3,4,9,-1] depth = 10 out = tf.one_hot(indices, depth) a = tf.Session().run(out) print (a) |
例3の結果
|
1 2 3 4 5 6 |
[[0. 1. 0. 0. 0. 0. 0. 0. 0. 0.] [0. 0. 1. 0. 0. 0. 0. 0. 0. 0.] [0. 0. 0. 1. 0. 0. 0. 0. 0. 0.] [0. 0. 0. 0. 1. 0. 0. 0. 0. 0.] [0. 0. 0. 0. 0. 0. 0. 0. 0. 1.] [0. 0. 0. 0. 0. 0. 0. 0. 0. 0.]] |
スポンサーリンク
axisの設定方法
基本はここまでですが、ここまで触れなかったaxisについて触れようと思います。これが少しとっつきにくいところもあります。
axisは軸なので、どこを基準考えて、one_hotするか?という指定です。
Featuresの場合
仕様
If
indicesis a vector of lengthfeatures, the output shape will be:TensorFlow | TensorFlow
  features x depth if axis == -1
  depth x features if axis == 0
例:axis = -1(features x depth)
|
1 2 3 4 5 6 7 8 9 10 11 12 13 14 |
#!/usr/bin/env python import tensorflow as tf indices = [1, 1, 2] depth = 3 axis = -1 out = tf.one_hot(indices, depth, axis=axis) a = tf.Session().run(out) print (a) |
結果:
これが今までやっていたものと同じです。もう、わかりますね。
|
1 2 3 |
[[0. 1. 0.] [0. 1. 0.] [0. 0. 1.]] |
例:axis = 0(depth x features)
|
1 2 3 4 5 6 7 8 9 10 11 12 13 14 |
#!/usr/bin/env python import tensorflow as tf indices = [1, 1, 2] depth = 3 axis = 0 out = tf.one_hot(indices, depth, axis=axis) a = tf.Session().run(out) print (a) |
結果:
少し結果が変わりました。depthとfeatureが入れ替わります。
|
1 2 3 |
[[0. 0. 0.] [1. 1. 0.] [0. 0. 1.]] |
イメージ図
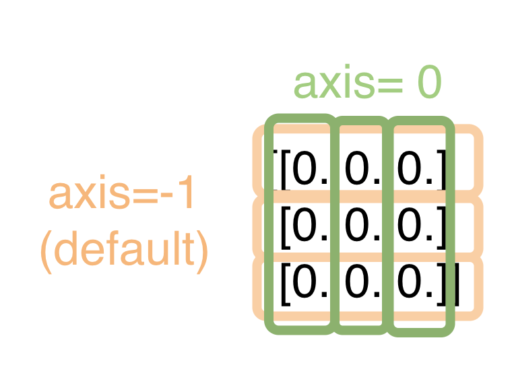
図にするとっこんな感じです。上の結果と比べてもらうとわかると思います。
axis=-1は、普通にdepthをone_hotするのですが、
axis=0は、軸を入れ替えてone_hotさせるということです。

batch処理の場合
次は、batchの場合です。この時は、軸が一つ増えるので、axisも3つになります。1つは、batchをまたぐということです。
If
indicesis a matrix (batch) with shape[batch, features], the output shape will be:TensorFlow | TensorFlow
  batch x features x depth if axis == -1
  batch x depth x features if axis == 1
  depth x batch x features if axis == 0
例: axis=-1(batch x features x depth )
一個、次元が増えているだけで、最初の例と同じですね。batch単位に
fetures x depthを、one_hotします。
|
1 2 3 4 5 6 7 8 9 10 11 12 13 14 |
#!/usr/bin/env python import tensorflow as tf indices = [[1, 1, 2], [0, 2, 2]] depth = 3 axis = -1 out = tf.one_hot(indices, depth, axis=axis) a = tf.Session().run(out) print (a) |
結果:
|
1 2 3 4 5 6 7 |
[[[0. 1. 0.] [0. 1. 0.] [0. 0. 1.]] [[1. 0. 0.] [0. 0. 1.] [0. 0. 0.]]] |
例: axis=1(batch x depth x features)
今度は、batch単位に、depth x features をします。さっきの例のfeaturesとdepthを逆に考えるだけです。
|
1 2 3 4 5 6 7 8 9 10 11 12 13 |
#!/usr/bin/env python import tensorflow as tf indices = [[1, 1, 2], [0, 2, 2]] depth = 3 axis = 1 out = tf.one_hot(indices, depth, axis=axis) a = tf.Session().run(out) print (a) |
|
1 2 3 4 5 6 7 |
[[[0. 0. 0.] [1. 1. 0.] [0. 0. 1.]] [[1. 0. 0.] [0. 0. 0.] [0. 1. 1.]]] |
例: axis=0(depth x batch x features)
今度は、depthが一番上位です。次元の組み替えが行われるので、頭でイメージすると、ちょっと複雑になります。
|
1 2 3 4 5 6 7 8 9 10 11 12 13 14 |
#!/usr/bin/env python import tensorflow as tf indices = [[1, 1, 2], [0, 2, 2]] depth = 3 axis = 0 out = tf.one_hot(indices, depth, axis=axis) a = tf.Session().run(out) print (a) |
結果:
|
1 2 3 4 5 6 7 8 |
[[[0. 0. 0.] [1. 0. 0.]] [[1. 1. 0.] [0. 0. 0.]] [[0. 0. 1.] [0. 1. 1.]]] |
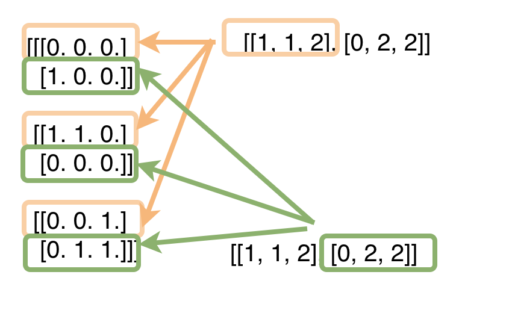
イメージ図
図にするとこんな感じです。オレンジのところを集めて、featuresの図のようにone_hotさせています。featuresが一番下の次元にあるので、図で言うと同じ色の要素を集めて、縦方向にみて、one_hotさせるということです。

まとめ
tf.one_hotについての記事です。axis考え方がややこしかったので簡単に整理してみました。説明に書かれている次元の順番を考えてどうなるか?想像すると考えやすいと思います。
少し迷ったのでメモしておきます。